Senin, 30 Mei 2011

GAMES MONSTER TRUCK CHALLENGE

Monster Truck Challenge is a game engine that runs on a circuit different moustrosa and different settings such as: forest, desert, mountains and others. If you won one of the tracks, the track and will open a new track, control car you drive to speed up and slow down use and direction, while the spin using left and right arrows, you also can use nitro to give encouragement that allows the car to jump further

File Size: 41 MB
Operating System: All Windows

Download


Read More..

Minggu, 29 Mei 2011

GAMES NITRORACER

Nitroracer is a small car racing game. Its a free game available for download, without any limitations. So you can freely download and play this racing game. Nitroracer is more like Grand Turismo light version. The cars is little bit old, but I like the graphic and sound. Its good for non paid game. My child will love it.

Nitroracers presents the speed and adrenaline rush better than any rally racing game before it. The smoke and fog looks realistic, but the scenery is little bit crap.

File Size: 44 MB
Operating System: All Windows

Download


Read More..

Sabtu, 28 Mei 2011

GAMES SKY TRACK

Sky Track is a racing game with unpredictable tracks, crazy speeds and dangerous rivals. Modernize your auto, choose any one of a huge number of different tracks, and get started! Ready, set, go!

Don’t forget about obstacles, or else you might just fall off the track. Earn more coins by carefully driving around obstacles and getting ahead of your opponents on the curves. The more money you get, the sweeter your ride will be! Be the best in these crazy races. Realistic 3D graphics and car physics will pleasantly surprise racing lovers.

File Size: 16 MB
Operating System: All Windows

Download

Read More..

Jumat, 20 Mei 2011

Formula FreeMCBOOT to USB OPLPS2loader

Exctract this file & replace on your external  ( USB HDD )...klik disini tuk download
Read More..

GAMES SUPER MOTOCROSS DELUXE

Super Motocross Deluxe is great and favorite game. Hopefully with the Super Motocross Deluxe game, you can get the game you are looking for. I am sure this games is the best for you and your PC.

All the fun of motocross without all of the mud. Ride the cliffs and ridges, jump across the chasms and try to beat the top times.


File Size: 35 MB
Operating System: All Windows

Download

Read More..

GAMES POLICE SUPERCARS RACING

Police Supercars Racing is a racing game. In this racing game gamers will become a cop and hunt down the criminals using a racing car. This racing game is made with Sun City background with a futuristic look.

Police Supercars Racing games itself is quite small only 64 Mb and you can play this racing game on Windows XP, Windows Vista and Windows 7. Not bad for you who want to spend free time by playing racing games.

Sun City is the city of the future, but the rising crime rate makes this place dangerous for living. Extremists block roads, criminals crash cars and hackers override the city’s automatic traffic control. The Special Supercar Police Unit was organized to blow the whistle on these practices.

File Size: 64 MB
Operating System: All Windows

Download

Read More..

Rabu, 18 Mei 2011

GAMES PACXON

Pacxon is the most popular game on the gamesolo site for good reason. It's a classic combination of retro arcade games Pacman and Xonix. Pacman, created by Namco, is one of the most recognized and played arcade games in history.

PacXon requires the gamer to keep condensing the game area until he/she have all the ghosts trapped inside a small enough space. As the player fills 75% or more space, the game advances to the next level, and now the gamer may have to deal with ghosts that skim the edges, eat away the covered area, and those move inside the covered area.

File Size: 3.4 MB
Operating System: All Windows

Download

Read More..

Selasa, 17 Mei 2011

GAMES PACMANIC

Pacmanic is a free game based on the original Pacman game. Almost an exact replica of the Pacman arcade game with challenging gameplay and great music, but now with amazing 3D graphics. Download this free Pacman-like game now.

Pacmanic is a pc game in which we have to eat yellow coloured balls by moving various.

Pacmanic Free Game Downloads. All Free Games Download are Trusted and Safe. No Trials. No Ads. Enjoy Pacmanic Free Game!

File Size: 1.9 MB
Operating System: All Windows

Download


Read More..

Kamis, 12 Mei 2011

Membuat Proxy Server berbasis Debian 5 (Lenny) sebagai Content Filter


Jenis aplikasi yang berfungsi untuk mem-blokir informasi yang datang dari internet di kenal dengan istilah Content Filter. Dengan aplikasi ini maka kita bisa menyaring informasi tertentu seperti pornografi, hacking, kekerasan dll yang tidak pantas muncul di browser client. Software yang bisa kita gunakan untuk membangun content filter diantaranya squid. Mari kita coba bersama bagaimana membangun proxy server sebagai content filter.

1. Pertama kita harus men-setting router dahulu. Untuk setting router dan IP nya dapat dilihat DI SINI.

2. Kemudian kita install paket-paket yang diperlukan yaitu squid.
Perintahnya :
D4V1D:~# apt-get install squid

3. Lalu remove / hapus pengaturan squid dasar, sebab kita akan membuat pengaturan dan rule yang baru.
D4V1D:~# rm /etc/squid/squid.conf

4. Setelah di hapus, buat squid.conf yang baru.
Perintahnya :
D4V1D:~# nano /etc/squid/squid.conf
Lalu isi squid.conf ini dengan script di bawah ini.
acl all src all
acl localnet src 192.168.1.0/26
acl situs url_regex -i "/etc/squid/blokir.txt"
http_access deny situs
http_access allow localnet
http_access allow all
http_port 3128 transparent
cache_mem 8 mb
memory_replacement_policy heap GDSF
cache_replacement_policy heap LFUDA
store_dir_select_algorithm round-robin
cache_dir aufs /cache 10000 24 256
cache_store_log none
cache_access_log /var/log/squid/access.log
cache_effective_user proxy
cache_effective_group proxy
visible_hostname proxy.bloganakkomputer.blogspot.com

Screenshoot squid.conf
keterangan :
Pada “acl localnet src 192.168.1.0/26” dapat disesuaikan dengan pengaturan IP anda yaitu ip yang anda gunakan pada eth1 dan merupakan gateway client. 

5. Buat list situs yang akan di blokir.
D4V1D:~# nano /etc/squid/blokir.txt
Isi dengan website atau kata kunci yang akan di blokir, sebagai contoh list di bawah.
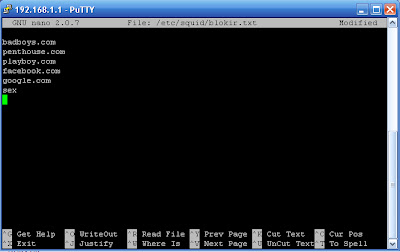


blokir.txt


6. Buat cache.
D4V1D:~# mkdir /cache

7. Lalu ketik perintah di bawah ini secara urut untuk membuat Swap Directories.
D4V1D:~# chown –R proxy:proxy /etc/squid/blokir.txt
D4V1D:~# chown –R proxy:proxy /cache
D4V1D:~# /etc/init.d/squid stop
D4V1D:~# squid –z

8. Start squidnya
D4V1D:~# /etc/init.d/squid start

9. Edit file rc.local.
D4V1D:~# nano /etc/rc.local

Lalu masukkan iptables di bawah ini sebelum #exit 0
iptables -A PREROUTING -t nat -p tcp --dport 80 -j REDIRECT --to-port 3128

Screenshoot rc.local

10. Terakhir, restart squidnya lagi.
D4V1D:~# /etc/init.d/squid restart

Pengujian

Untuk menguji content filter kita apakah sudah berhasil atau belum kita jalankan aplikasi Mozila Firefox. Sebelumnya kita perlu setting dahulu proxy nya. Ini cara settingnya…

1. Pilih Tools – Option

2. Kemudian pilih tab Advanced - Network, pilih Settings
Pada halaman Connection Settings, pilih Manual proxy configuration dan setting supaya menggunakan HTTP proxy 192.168.1.1 dan pada port 3128 (seperti gambar di bawah).


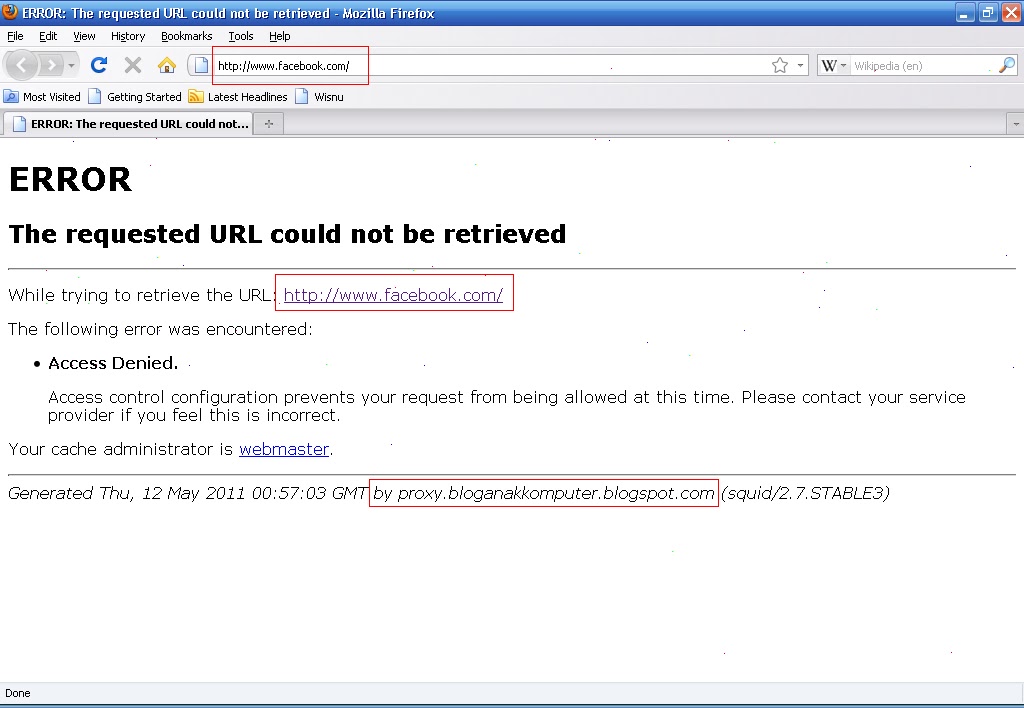
3. Nah sekarang kita coba ketik salah satu url yg telah kita setting pada blokir.txt di atas. Kita masukkan facebook.com pada address bar.


4. Jika hasilnya seperti pada gambar di atas, maka content filter kita sudah bekerja dengan baik dengan memblok situs facebook.com. Dapat juga kita coba dengan situs-situs yang telah kita masukkan.

Ok, teman-teman sekian dahulu sedikit ilmu dari saya (dari hasil browsing dan googling, hehe...) tentang Membuat Proxy Server berbasis Debian 5 (Lenny) sebagai Content Filter.
Semoga bermanfaat kawan.

D4V1D
Read More..

Rabu, 11 Mei 2011

Membuat Proxy Server berbasis Debian 5 (Lenny) sebagai Autentikasi User


Dengan squid memungkinkan kita untuk membuat pembatasan koneksi melalui autentikasi. Dengan autentikasi maka user dipaksa harus memasukkan username dan password. Bila username dan password tersebut cocok dan terdaftar dalam database squid maka user tersebut diperbolehkan terkoneksi ke internet. Nah, pada tutorial kali ini saya ingin membahas sedikit tentang membuat proxy server berbasis Debian Lenny yang digunakan untuk autentikasi user sederhana. Bagaimana cara membangunnya? Mari kita coba bersama…

a. Pertama kita harus men-setting router dahulu. Untuk setting router dan IP nya dapat dilihat DI SINI.

b. Sebelum kita mengkonfigurasi autentikasi user mode ncsa dengan squid kita install dulu paket-paket yang dibutuhkan yaitu squid dan apache2. Kita install kedua paket tersebut dengan perintah :

D4V1D:~# apt-get install squid apache2

c. Ketikkan perintah di bawah ini secara urut.

D4V1D:~# touch /etc/squid/squid_passwd
D4V1D:~# chmod o+r /etc/squid/squid_passwd
D4V1D:~# htpasswd /etc/squid/squidpasswd david
(masukkan password baru)
(masukkan ulang password baru)


Screenshoot

Gunakan program htpasswd untuk menambahkan user ke file password. Anda bisa menambahkan setiap user setiap saat tanpa harus merestart Squid. Dalam hal ini, anda menambahkan satu username david.

d. Konfigurasi file squid.conf
Pada file squid.conf ada 2 konfigurasi utama yaitu meng-enablekan ncsa_auth dan konfigurasi acl serta http_access.
perintah :
D4V1D:~# nano /etc/squid/squid.conf


Hilangkan tanda “#” pada baris yang di dalam kotak. Pada bagian akhir kita ubah menjadi “/etc/squid/squid_passwd” (lihat gambar di atas).

Lalu tambahkan script seperti yang saya beri tanda kotak (seperti gambar di atas). Kita buat acl (access control list) dan http_access untuk mengatur apakah user diijinkan untuk melakukan autentikasi. Pada intinya hanya seperti itu.

Setelah semua konfigurasi selesai kita restart squid dengan perintah
D4V1D:~# /etc/init.d/squid restart

Pengujian

Untuk menguji autentikasi user kita apakah sudah berhasil atau belum kita jalankan aplikasi Mozila Firefox. Sebelumnya kita perlu setting dahulu proxy nya. Ini cara settingnya…

1.    1. Pilih Tools – Option

2.    2. Kemudian pilih tab Advanced - Network, pilih Settings
     Pada halaman Connection Settings, pilih Manual proxy configuration dan setting seperti gambar di bawah


3.    3. Sekarang kita coba ketik google.com pada address bar  dan hasilnya seperti di bawah ini


     Kita akan diminta memasukkan username dan password untuk dapat browsing.

4.    4. Nah kita masukkan nama user dan kata sandi nya seperti yang telah kita buat di atas. Kebetulan nama user saya “david” dan kata sandinya “123”. Setelah kita memasukkan nama user dan kata sandi squid akan meredirect to google.com.. Kemudian langsung browsing aja deh.

Ok, teman-temanku sebangsa dan setanah air sekian dahulu sedikit ilmu dari saya (sebenarnya dari hasil browsing dan googling, hehehe) tentang Membuat Proxy Server berbasis Debian 5 (Lenny) sebagai Autentikasi User.
Semoga berguna ya.
D4V1D

Read More..

Membangun DHCP Server pada Debian 5 (Lenny)


DHCP (Dynamic Host Configuration Protocol) adalah sebuah mekanisme yang memunkinkan sebuah server untuk memberikan IP Address secara dinamik bagi client. Client melakukan permintaan IP Address kepada server, dan server memberikan alokasi bagi si client tersebut. Mekanisme ini akan sangat memberikan keuntungan bagi manajemen jaringan di karenakan proses setting IP Address tidak harus dilakukan manual untuk setiap client yang ada.

1. Instalasi

Software yang diperlukan untuk membuah sebuah service DHCP adalah dhcp3-server. Untuk melakukan instalasi dhcp3-server lakukan perintah:
D4V1D:~# mount /dev/dvd /cdrom  (berfungsi untuk mengenalkan cd installernya / proses mounting)
D4V1D:~# apt-get  install dhcp3-server  (untuk proses instalasi)

2. Konfigurasi

File konfigurasi dhcp3-server terletak di file /etc/dhcp3/dhcpd.conf. Gunakan editor nano untuk melakukan editing terhadap file konfigurasi tersebut. Sebelum melakukan konfigurasi DHCP Server, beberapa hal harus kita perhatikan diantaranya:

1. Alokasi IP Address yang akan diberikan kepada client harus berada satu network dengan IP Address server
2. Tentukan rentang IP Address yang akan diberikan kepada client tersebut
3. Alokasi IP Address untuk si client harus pula dilengkapi dengan subnet,  netmask,  dns server,   gateway,   broadcast

Edit file dhcpd.conf dengan perintah:
D4V1D:~# nano /etc/dhcp3/dhcpd.conf

Contoh konfigurasi DHCP yang saya buat, sesuai dengan IP yang telah kita setting pada pembuatan Router sebagai berikut.

# A slightly different configuration for an internal subnet.
  subnet 192.168.1.0 netmask 255.255.255.192 {
  range 192.168.1.10 192.168.1.20;
  option domain-name-servers 172.16.16.1;
  option domain-name "bloganakkomputer.com";
  option routers 192.168.1.1;
  option broadcast-address 192.168.1.63;
  default-lease-time 600;
  max-lease-time 7200;
}


Screenshoot dhcpd.conf

Jangan lupa lakukan proses restart terhadap service setiap kali kita melakukan perubahan pada
file konfigurasi:
D4V1D:~# /etc/init.d/dhcp3-server restart

3. Pengujian

Pengujian di Client
Untuk melakukan pengujian di sisi client, beberapa hal harus dilakukan diantaranya:
1.  Pastikan server dan client saling terkoneksi
2 . Lakukan proses pengaturan di sisi client bahwa settip IP Address di lakukan secara automatic.

1. Ikuti langkah-langkah berikut untuk melakukan setting di sisi client:
    Klik menu start - Control Panel
    Pilih Network Connection
    Pilih Local Area Network - klik kanan mouse - pilih Properties
    Pilih Internet Protocol (TCP/IP) - Pilih Properties
    Pilih opsi Obtain an IP address automatically
    Pilih opsi Obtain DNS server address automatically - tekan tombol OK


2. Setelah langkah diatas dilakukan, kita harus melakukan pengujian terhadap layanan service DHCP dari server. Ikuti langkah berikut:
     (a) Klik menu start - run ketik "cmd" . Maka akan muncul halaman dos prompt
     (b) Pada halaman Dos prompt tersebut lakukan perintah ipconf ig /release, pastikan bahwa IP address 
            dari interface berubah menjadi 0.0.0.0
     (c) Masih pada halaman yang sama ketikkan perintah ipconf ig /renew untuk memperoleh IP Address 
           dari server.
     (d) Bila tidak terjadi kesalahan seharusnya client sudah mendapat IP Address dari server.

Perhatikan gambar berikut yang membuktikan bahwa DHCP Server telah bekerja dan client memperoleh IP Address dari server.


Jika kita lihat Propertiesnya akan terlihat sebagai berikut.


Lalu coba kita ping gatewaynya..


Jika hingga langkah ini kita telah mendapat IP dari server dan ping gateway lancar berarti DHCP Server yang kita buat telah dapat berjalan dengan baik.
Sekian tutorial tentang DHCP server dan selamat mencoba.
D4V1D
Read More..

Jumat, 06 Mei 2011

List of Gateway DoTA BattleNet


Ini merupakan daftar/list gateway DoTA yang bisa anda coba dan anda dapat mendaftar account setiap server pada alamat registration yg disertakan.

IDGS Free
Name: IDGS Free
Zone: 7
IP address: free.indogamers.us

IDGS Junior
Name: IDGS Junior
Zone: 7
IP address: junior.indogamers.us

NUSA Reborn
Name: Nusa Reborn
Zone: 7
IP address: dota.nusa.net.id
Registration: http://dota.nusa.net.id

Neo MGI
Name: Neo MGI
Zone: 7
IP address: pvpgn.mediagamer.biz
Registration: http://pvpgn.mediagamer.biz/register

UFO Wave
Name: UFO Wave
Zone: 7
IP address: pvpgndocs.berlios.de
Registration: http://ufo.lintaswave.net/pvpgn

Nucleus gaming
Name: Nucleus gaming
Zone: 7
IP address: 202.43.163.98
Registration: http://www.NucleusGaming.com

The Blitz DotA
Name: TheBlitz
Zone: 7
IP address: 202.58.163.204
Registration: http://hervin.f-rum.com

Kings Battle
Name: Kings Battle
Zone: 7
IP address: 202.74.73.98

Access Zone
Name: Access Zone
Zone: 7
IP address: access8.net
Regristation: www.accesszone.net

Gokil Gamers
Name: Gokil Gamers
Zone: 7
IP address: 202.43.164.50
Regristration: http://www.gokilgamers.com


Mati Aje Lo
Name: Matiajelo
Zone: 7
IP address: dota.matiajelo.com
Regristration: “Create New Account”


Wiz Battle NET
Name: Wiz Battle NET
Zone: 7
IP address: 202.134.6.45
Regristation: “Create New Account”

Depok PVPGN
Name: Depok
Zone: 7
IP address: depok.servegame.com
Regristration: “Create New Account”

Life NiX
Name: Life NiX
Zone: 7
IP address: Lifenix.Mine.Nu
Regristration: “Create New Account”

Indoplayer
Name: Indoplayer
Zone: 7
IP address: 119.235.249.254
Regristration: http://www.indoplayers.com/pvpgn

Batam Gamers
Name: Batam Gamers
Zone: 7
IP address: 222.124.136.55
Regristration: http://batamgamers.my.or.id

LEBAY
Name : Lebay
IP : 202.52.48.230
Zone : 7

Dotaners
Name : DotAners
Zone : 7
IP : bnet.dotaners.com
Registration: http://bnet.dotaners.com/register/ free until Januari 1st 2011

Untuk Panduan Instalasi DoTA Bnet Gateway nya dapat KLIK DISINI.

Selamat bermain....
Let's War....
Read More..

Gunakan Google Chrome Untuk Mendapatkan Tampilan Terbaik Blog Ini ( ^_^ )